Monday, November 15, 2010

A Hunk of Meat, a Can of Beer and a Crockpot

You thought this was going to be an X-rated post, didn't you?  Well, now that I have your attention hopefully you will read the rest. ;) There are so many things you can do with this combination!  Just yesterday I threw a pork roast in with a can of beer and cooked them all day.  Then I stringed the pork and added enough of the juice to cover, then put it in the fridge.  Tonight I will reheat the pulled pork, then pour off most of the liquid and replace with Sweet Baby Ray's BBQ sauce, and we will have Pulled Pork Sandwiches.  I will freeze the leftovers, and when I thaw them out I will add 2T taco seasoning and maybe some corn and salsa.  Place on a hot tortilla and melt in cheese and you have Pork Quesadillas.  You can also make Chicken Quesadillas the same way, just substitute chicken breast.


If you start with a beef roast, you can add BBQ sauce for Beef BBQ sandwiches, or you can add an envelope of onion soup mix and a tsp of Worcestershire sauce while cooking in the crock pot.  Then you will end up with French Dip Sandwiches.  Or you can make Pot Roast by roast + beer + beef bouillon + carrots, potatoes, onions and celery.  To make gravy, just remove the juice and thicken it with a little cornstarch before serving.

If you start with stew meat, you can make Beef Stew instead of Pot Roast  by just changing the meat and not making the gravy.   Or you can make Beef "Tips" and Noodles by adding mushrooms and bouillon, then thickening the juice and serving over noodles.  If you add mushrooms and onion soup mix, cook, then add sour cream and thicken, you will have Beef Stroganoff. 

I'm sure there are lots of other combinations but that's a start.


Dinner:  Pulled pork sandwich (see above)  Applesauce  and Fried
Baby Potatoes (see previous post)
And the best part is, it was all ready within 20 minutes of when I walked through the door!

Wednesday, November 10, 2010

Hard Candy

Now that November has settled in, I am acknowledging my next obsession.  Candy Making.  I love making candy, perhaps more than eating it.  The foundation of my candy making obsession is Hard Tack.  I remember making this candy with my mom as a kid, and now I make it with my kids, particularly, my middle daughter Julia.  Julia has progressed from standing on a chair as a toddler watching from a safe distance, to being my full partner in the process.  We now make 2 batches at a time and "race" to the "310" temp.  Along with Julia, our process has grown and evolved through the years.  We have gone from trying wacky flavors like cotton candy and pouring onto buttered cookie sheets to a sophisticated system of flavor mixes and breakaway molds.  The end result has been about 10 pounds each of a fruit mix and a spice mix for the last few years.  This year we will be adding a tropical mix, just for fun.

Before we start making candy, we make a chart with all the flavors and colors we plan on using.  That way we avoid duplicating colors within mixes.  For example, Tutti Fruiti is pink, while cherry is red. 

This year's fruit mix went like this:

Blackberry     Blue
Lime              Lt. Green
Tutti Fruiti      Pink (1 drop red)
Cherry           Red
Grape            Purple
Lemon           Yellow
Orange          Orange
Watermelon  Dark Green

We use the Lorann Oils recipe and flavorings with a few modifications.  I was watching Alton Brown the other night and as much as I love him I have to disagree with a few of his points too.  Primarily I adjust the color as the candy cooks, rather than waiting until it reaches 310, and I wait until boiling ceases altogether before adding flavor:

Basic Candy

2 c granulated sugar
2/3 c light corn syrup
3/4 c water

Combine these in a medium sauce pan with a thermometer and stir with a wooden spoon.  The wooden spoon for some reason helps keep the mixture from boiling over while the water boils out.  I didn't believe it either, but it works.  Adjust the color to the shade you want.  Boil, stirring occasionally, until the temp reaches 310F.  This is the hard crack stage in candy making.  There are lots of resources on the web to learn about this, so I won't go into the chemistry/physics.


Remove the thermometer, then allow the candy to stop boiling.  It will still be bubbly, but there will not be new bubbles when you stir when you get to the point we are looking for.  At this point, add the flavoring and stir with a silicone spatula, then pour into a greased candy mold which has been placed on a cookie sheet.


Allow the candy to cool and set, then break apart.  I resisted using the molds for years  because I like my old fashioned hard candy to look rustic, and I broke it apart by hand and this is certainly possible.  But a couple of years ago my friend Heather tried the molds and loved them, so it has been in the back of my mind.  This year I ordered my flavorings directly from Lorann, and they were selling the molds too  so I decided to give it a go.  My review is that they are awesome and cut the process time in half,  We didn't end up with little cuts all over our fingers like we do when we break the candy by hand.  We were able to make 8 batches of candy in about 2 1/2 hours, where before 4 or 5 were all we could manage in an entire day. 


After you break the candy apart, put it in a bowl and dust with powdered sugar.  Then place in a strainer and shake to remove the excess powdered sugar.  Store in an airtight container. It should last about 8 months, or until the humidity gets to high in your climate. 

Also, the leftover powdered sugar has little shards of colorful candy and you can use it for a dusting sugar for brownies or cookies or something. 

All in all, I wish I could say that the satisfaction I get from making this stuff is somehow related to my love of science.  There are certainly lots of interesting chemical and physical changes going on in those sugar molecules.  But really I think it's a more primal love of the shiny glassy colors that gets me.  I may have been a glass blower in a former life, or maybe a crow or a magpie.

Monday, November 1, 2010

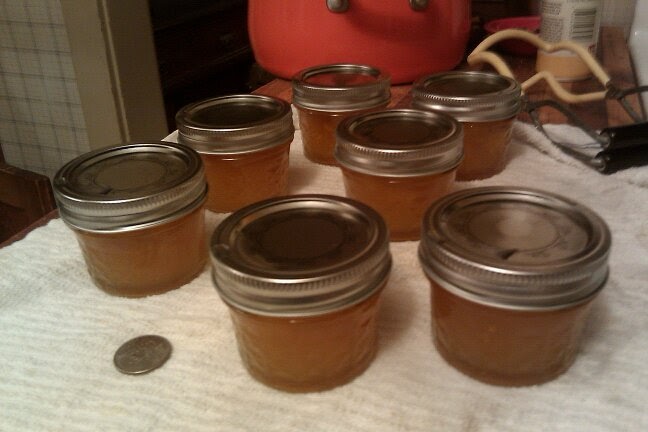
Trifolate Orange Marmalade or I Swear this is the Last Canning Post for a While


One of the souvineers we brought home from our fall getaway was a small bag of what turned out to be trifolate oranges.  We found these growing in the garden of a historical mansion we were visiting.  The mansion was closed, but these exotic little fruit were perfectly ripe and waiting for me.  A stray docent happened by and told me to go ahead and take some, so I did.   The trifolate orange is a tiny hardy orange that grows on a small tree about 8-10 feet tall with lots of thorns.  It is commonly used for grafting stock and can withstand a certain amount of freezing, which is why we found it growing on the southern Maryland coast. 

In searching for something to do with my found treasures I learned that these are not true oranges, being from a diferent genus in the orange family, and that eating them raw can cause gastric distress.  They are recommended for making marmalade. 

I had never made marmalade before, but I was game to try.  First I used a carrot peeler to shave away the outer portion of most of the rinds of the oranges.  Then I attempted to peel and pulp the little guys.  Turns out they are packed with seeds, and a little juice, and a very little pulp.  So what I did was cut them open and squeeze out the juice and seeds, then put through the food press.  This left me with about 3/4 c of juice that tasted like the result of a mating between a grapefruit and a pine tree. 

Undaunted I decided to suplement my bitter/sour juice with an equal amount of orange juice and the pulp of 3 oranges.  I then chopped the peelings from the trifolates and one of the oranges and combined them with the juice/pulp and boiled for 5 minutes.  This I allowed to sit overnight in the fridge.  I don't know why it needs to sit, but the Ball Blue Book said to, so I did. 

The next day, I boiled the juice/pulp/peels with about a half package of pectin, then added and equal ammount of sugar and boiled for 3 minutes, then packed hot into hot jars and processed 5 minutes in a boiling water bath to seal.   This seems to have gelled, and the result is a very classy slightly bitter marmalade.

Sunday, October 31, 2010

Pictures


Rebecca Storing Apples


Rebecca Slicing Peppers to Freeze


Rebecca's creepy Pumpkin


Volunteer Squash


Squash Wrapped for Stoarage

The End of the Harvest

Halloween marks the end of the harvest here in  Western PA.  The small towns shift from harvest festivals to Christmas Light up nights and Holiday Craft Shows.  George and I have spent the weekend beginning to tighten things up for the winter.  He has pulled his beloved Tommato plants and  we made our final trip to our Farmer's Market, which closes today until next July. Most of the preserving I have written about up to now has been canning, but I also do some freezing and cellaring.

I dont't have a fruit cellar exactly, but we do have a storage room under what used to be and enclosed porch and is now our entryway.  It is quite a bit cooler than the rest of the house, but doesn't freeze, and it has no windows.    This year we are trying storing a box of apples and a box of winter squash.  We wrapped the squash and apples in paper to avoid spreading of spoilage then carefully placed them in boxes.  Here I should mention that a good portion of the squash were an acorn variety that came up as a "volunteer" in our compost pile.  I love those little presents from mother nature.

I also do a small amount of freezing for the winter.  The reason that the ammount is small is that I tend to forget about the food that I have frozen for some reason, and in the many cases, such as tomatoes or soup, it takes too long to thaw them.  But this year I froze a few things, such as the potatoes and green beans I mentioned before, and today I froze some more potatoes, this time with bacon.  Without fail, however, I always sock away a gallon freezer bag full of frozen sweet peppers. 

Frozen Sweet Peppers

1)  Wash, seed and slice the peppers.
2)  Place about 1/4 to 1/2 a cup of sliced peppers in a sandwich bag, remove the air and seal.
3)  Place all of the sandwich bags into a gallon freezer bag and freeze.

These keep very nicely all year, and are very usefull for adding to stir fries, pizzas, cheesesteaks, omlets, etc.  The flavor is a little stronger in the frozen peppers, so you may not want to use as many as you would fresh.  They are also much cheaper than buying fresh in the middle of winter.

This year I also did this with onions. 

Friday, October 15, 2010

Fall Getaway

I am winding down the canning season, at least the water-bathing.  I have a half-bushel of apples left to turn into applesauce tomorrow, and then I think I will begin packing up.  For one thing, the harvest is nearly over, with only a few squash left at the local farmers' markets.  Also, my larder is stocked to overflowing!  I may get ambitious and try to take a full inventory of all that I have done, but here is at least a partial list:

2 bushels of peaches, canned sliced in medium syrup
peach/jalepeno jam
peach jam
grape jelly
grape syrup (see above)
20 pints of salsa
stewed tomatoes
tomato soup (lots)
applesauce (tons)
red onion relish
sweet onion relish
bread and butter pickles
roasted red pepper spread
green beans
cubed butternut squash
chunked pineapple
spiced fruit compote
spiced peaches
peach syrup (leftover from the spiced peaches)

After having a well stocked pantry, the next topic in my guide to How to Survive the Winter is the Fall Getaway.  I find that this helps my morale immensely.  We go to Chincoteague every fall to watch some of the fall migration of waterfowl, to eat the delicious local harvest (crab, oysters, and fresh fish), and to just relax.  Our other family vacations tend to be more frenzied, in a do everything/see everything kind of way, but there is a comfort in our fall vacation.  We return to the same small town, stay in the same hotel (often the same room), and do the same sort of activities every year.  I return refreshed and ready to face the winter.

Thursday, October 7, 2010

That's Right. I Said Jelly

I have a reputation as a good cook, and a crafty person, but not everything always goes well for me.  I  have always had trouble with jellies and jams setting properly.  This year, before last sunday, I had made:

3 batches of runny Peach Jalepeno Jam
1 batch of runny regular Peach Jam
1 batch of super gummy Grape Jelly
1 batch of Grape Syrup (supposed to have been Jelly-which I had processed twice, with a new package of pectin each time).

On Saturday George took me to the Franklin Applefest, and bought me a fresh load of produce including 2 fresh batches of grapes.  So once again with some trepidation I set out to make Jelly.  I am pretty sure that the problem with the syrup is that I forgot to boil the juice and pectin before I added the sugar.  And I am happy to report that I was successful and now have a pantry full of 3 types of grape jelly, Mixed Grape (3 colors)  Concord Grape, and Grape Apple (which I made by re-cooking the pulp from the first two batches with the apple cores from the 18 pints of applesauce that I also made that day).  I still don't know what my Jam problem is, but I am more confident that I can make grape jelly.

Also I made more soup and applesauce.  And I began my venture into pressure canning with green beans.

But that is another post...